Wednesday, October 27, 2010

The Chanel Challenge: Part 1

The shell fabric (the fashion fabric) is cut out. I have to now cut out the lining fabric. When I purchased the fabric, I also purchased a nice pink lining for the jacket. I knew that I would be making a Chanel inspired jacket as far as the look went, but I hadn't planned on using some of the couture techniques. After doing some research, I decided to give it a go. So with that, the lining needed to be larger than the pattern pieces. So the lining that I purchased would no longer work. I didn't have enough fabric. I did manage to find some material that my sister Brenda sent me a couple of years ago. Finally found a use for it. The lining doesn't quite match the shell fabric but I was not going to leave the house. I needed to stay and sew.
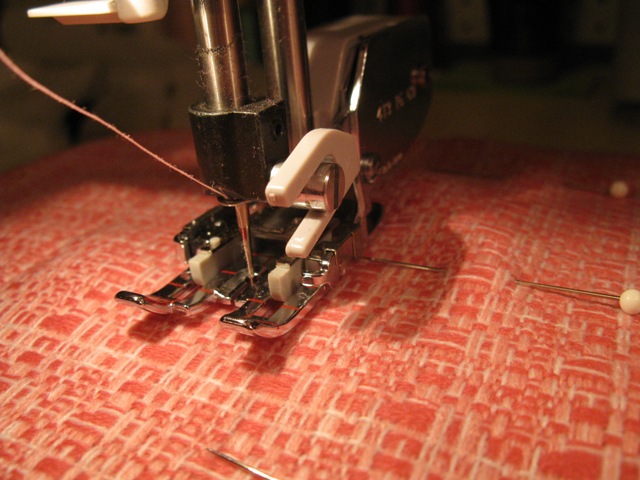
The jacket shell is pinned to the lining fabric then cut out. I tried to cut at least two inches all the way around the pattern. I was a little short in some areas. I think I'll be fine. After cutting out the lining, I took the two pieces to the sewing machine to quilt together. I switched out my presser foot and put on the walking foot. You can see that my quilting doesn't line up in the pattern pieces. Hey, she's six, she's six. I'm not going to worry about it. You can't see the stitching lines on the shell so I'm good to go. I'm quilting about two inches apart and I'm stopping my stitching about two inches from the edge of the shell fabric. I need to have the fabric free to stitch the seams.

After all the pieces were quilted, I took the front and back sections and stitched them together at the side seams. Then pressed the seam of the shell fabric open. I took my scissors to the piece and trimmed to one inch larger than the pattern.


Finally, I trimmed the lining seam allowance then hand
stitched the lining down.

Sunday, October 24, 2010

Coco for Coco: The Chanel Challenge

I love Chanel. It doesn't matter if it's a purse, jacket or dress. You can tell a Chanel. The name Chanel has bring bringing people in thru the doors since 1912 when Gabrielle Chanel set up a millinery shop. It was around 1925 that the Chanel cardigan was born. The cardigan and the brand are still going strong now under the leadership of Karl Lagerfield.

Coco Chanel may be the most famous designer of all times. Coco brought us menswear as ladies wear in the 1920's. Scandalous for that time. She brought us the Chanel jacket, bell bottom pants and of course, the little black dress. What are the details that signal Chanel? She loved jersey, tweed, boucle, chains, trims, ribbons and buttons. Her construction techniques differed from the other couture shops. Coco's jacket linings are quilted to the shell fabric. You will not find facings in the jackets either. She used chains on the hemline so the jackets hung right and didn't loose their shape. These jackets do not come cheap. I don't know if you can purchase a Chanel jacket for under $4000. Thus the challenge.


Last year, I was cruising around Hancock Fabrics. I first spied some odd pink fabric. I didn't purchase it that day but I kept thinking about it. It was either on the second or third trip to Hancock's that I succumbed. Have you ever brought home an orphan? That's how I felt about the fabric. It needed a home. Nobody wanted it. It had been on the clearance rack a while. It was during the several trips around the clearance section that I spied the "Chanel" fabric. With that in hand, I knew my odd pink fabric would have a partner. Now the the bridal gown is finished, I guess I need a new challenge. One that will push my skills. So what better project than a Chanel jacket. This will be a practice Chanel. I won't be putting a chain in the hemline. I won't be adding pockets. My trim may be minimum unless I can find something appropriate for the fabric. I can't go full bore Chanel since I have a customer to please. She's only six. So I have to balance her likes with my wants. Follow me as I plunder thru some Chanel techniques. I have a 50% chance of succeeding. I won't know until I try. I hope you're all able to come along for the ride.

The Bridal Veil

Is there anything more that signals bride than a veil? You can put a woman in a bridal gown but a mother may not shed a tear until the veil is put upon the bride. That is the crowning touch in the bridal ensemble. The veil makes the bride.

Bridal veils have a long and varied history. Veils in times past were used to protect the bride from evil spirits. In arranged marriages, the bride was veiled and the groom did not see his bride until after the ceremony. In some cultures, the veil is used to shield the bride from other men who may make an attempt to steal the bride. In modern times, the veil is used to accent the bridal gown.

If any of you have gone bridal gown shopping, you know that veils can start anywhere from $50 to over $1000. The amount of lace, quality of the lace and the length of the veil will determine the cost. You can also save yourself hundreds of dollars by making the veil yourself. A couple of weeks ago, I posted the week of edging experimentation. Today, I'm just going to show you the final result. I took roughly 130 inches of bridal tulle. The width of the tulle is 108 inches. I cut the tulle into an oval. You could certainly have more of a rectangular edge. I then took 25 inches in the middle of one edge and gathered that. I handstitched the gathers onto a metal comb. I purchased the comb from Lacis.com. The gathering and handstitching came after the pencil edge finsh. Here is the finished result.

Saturday, October 23, 2010

Double Layer Skirt: This Time Halloween

The Barbie skirt went together fairly easily so I decided to make another skirt. This time I used some Halloween fabric that I found at Hancock Fabrics. The orange fabric is from my quilt stash.

I decided to make this skirt a tad smaller than the Barbie skirt. I tried to remember Kayla's waist measurement. I think I overestimated that measurement by at least an inch.

Both designs are from Planet Applique. I really do shop at a multitude of shops but I just seem to connect with PA designs a little more.

Trick-or-Treat Bags

I'm a little disappointed how these bags turned out. I purchased the bags last year and never got around to the embroidery.

I wanted to do a glow-in-the-dark design for the nephews. I felt that the ribcage would be perfect for glow thread. My machine did not like this thread. I used Coats & Clark brand. I hadn't heard anything negative about the thread. I knew that there were people who didn't like their embroidery thread but nothing on the glo thread. I decided to try it. Unfortunately, I had severe thread loops while stitching the design out. I really should have completed one more rib cage bag, but was frustrated with the two that I did. So my nephew Matthew will get the short end of the stick. The "glo" part of the glow thread really does work. I don't know how long the glow will last on Halloween night though.

Now for the witch bag. I'm not liking the placement on this. I was toying with the idea of putting a witch face about the skirt. I decided against it. Then I go and place the tutu netting to high up. I found some reflective tape in my stash. I honestly don't have any idea how I acquired that. Maybe from my mom. As you can see in the photo, the tape works really nice.

If you look really close at this picture, you can see the ribcage outline. The design shows up really nice in the dark, you can't really see it in the picture.

Both designs are from Planet Applique.

Tuesday, October 12, 2010

Parisian Barbie Girl

A few weeks ago on SewForum.com, a member asked about having another sewing challenge. We decided to try the Double Layer Skirt pattern found at Everyday Chaos. You can find the tutorial here.

I set off to the fabric stores in search of fabric. I suppose I could have found something under my roof but I was in the mood for some fun fabric. It was at Hancock Fabrics that I found something that fit the bill. There I spied two bolts of Barbie fabric. Perfect.

I purchased the fabric, brought it home and tucked it away. With the wedding being about four weeks away, I had no intention of sewing up this outfit. That turned out to be a good thing. A couple of weeks later, I was shopping on fabric.com (courtesy of my friend Yvonne) and found one more Barbie print. Now the decision would be which of the three prints to use. I decided for the first skirt to use the poodle print from fabric.com and the underskirt is from Hancock's.

The embroidery designs are all from Planet Applique. Minky was used on the poodle. I think I should have chosen a darker fabric for the poodle applique. It looks a little light compared to the skirt. The pink t-shirt isn't a very good match either. Darn it all.

Sunday, October 10, 2010

A Day in the Life of Heidi

This is for all you Project Runway fans. Good to see everyone has a sense of humor. I love Tim Gunn. I would love to see him have his own show in the future. Let's face it, Heidi's amazing. Anyone who can sew in stilleto's is A OK. I have a hard enough time sewing in my sock monkey slippers.

Monday, October 4, 2010

Say Yes to the Dress!

The wedding came and went. Quickly. Thank goodness the gown was finished and the flower girl dress fit perfectly.

The day before the wedding, I decided to redo the bustle loops. All night long I worried about the loops and the bustle not holding. So when I got up the next morning, I clipped off all the loops and redid the loops with a double strand of upholstery thread instead of a single strand. By the grace of God, the bustle held.

Unfortunately, I don't have any pictures. I was just too busy and actually too exhausted to think about pictures. Here is what I have for right now gleamed from others.